I thought I would show you the first results today from version two of the “open” Bonse Hart Ultra-SAXS instrument. This instrument took a while to (re)build, but the new version is much easier to assemble and cheaper to boot. However, I am having a tough time measuring anything but air!
First a short introduction for those who (somehow) haven’t seen my many posts on the instrument. I will then quickly talk about the initial results.
INTRO
This instrument is built using mainly (modified) off-the-shelf components and quite some printed parts to hold everything together. It consists of three parts: an enclosure, a collimation section and the “business end” with the two rotations and detector holder.
Everything is built on top of an optical table, though this is a choice mostly for historical reasons (i.e. I had such a table available).
The redesign separates the two rotations, and puts them on sliding rails as well as big lab jacks. This makes it easier to (re-)align the crystals, with a full alignment only taking about a day or so. A realignment of the two crystals can be done in about an hour (a procedure which needs to be done every few weeks or so).
The instrument now runs on a Xenocs microfocus source (molybdenum target, low-divergence optics attached). It furthermore uses 4-bounce Si(220) crystals rather than the previous two-bounce Si(111) crystals.
INITIAL RESULTS

Ten direct beam scans are shown in Figure 1. This shows us quite some things about the instrument.
For the redesign, the rather pricey and fragile M230 linear actuators have been replaced with less expensive M228 variants (a difference of 2500 vs. 700 euros per actuator). The cost of this is a reduced motion resolution, the results of which are evident in the direct beam profile, which therefore shows some “steps” rather than a smooth curve.

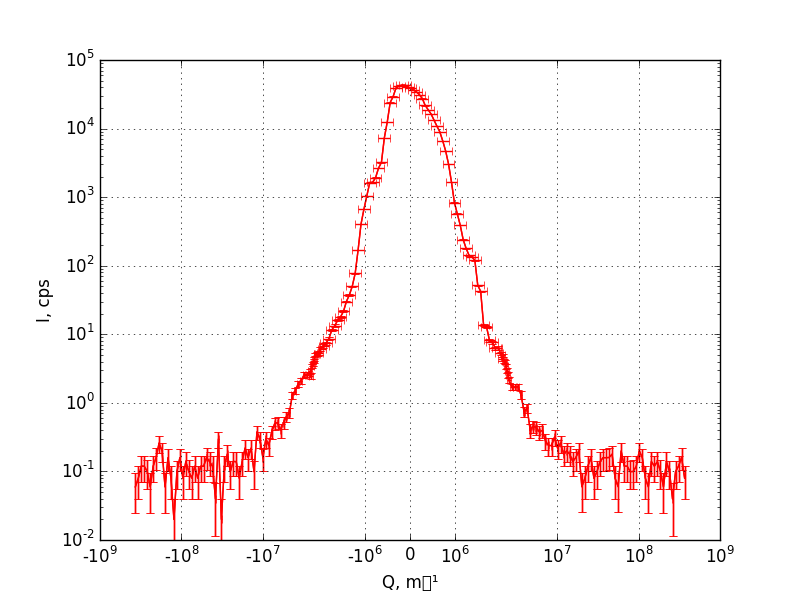
The position of the central peaks (which can be approximated by calculating the centre of mass) can tell us a bit about the repeatability of the scans. At the moment, the standard error on the mean peak position is about 130000 m⁻¹. Using this and the scans, we can determine the average scattering pattern with uncertainties in both scattering vector as well as scattering intensity. This is shown in Figure 2.
A few measurements show that the darkcurrent of the scintillation detector is about 0.11 counts per second. This is with the generator shutter closed, using the current detector electronics settings. This means that our “background” level at high q is dominated by this detector darkcurrent. Replacing the detector with an Amptek SDD should lower this level considerably. However, while I have this detector ready, it has to be fed a particular set of voltages for which special power supplies had to be ordered. Tests with that detector will have to wait a bit.

Anyway, so far so good: we have a decent dynamic range, reasonable angular resolution and a stable X-ray generator (problem free for now). Time to put a sample in place! I had a piece of glassy carbon lying around, used for calibration measurements. This is a common strong scatterer which we may be able to use for some calibrations. And so this was stuck in front of the beam, and the measurements run with the same settings.
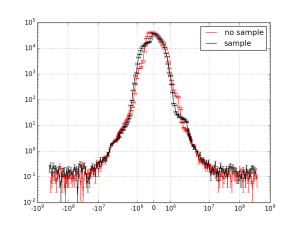
However, Figure 3 shows nothing. While version one of the instrument appeared to show a nice flat signal of glassy carbon around 1 cps, we see no discernible signal here. No popping of corks just yet, troubleshooting awaits!
A few things come to mind which may be amiss:
- The change in crystal angle could result in occlusion of the signal by the detector entrance slit (2mm wide). A calculation shows that this may be an issue for the wider angles, but should not be an issue for the smaller angles.
- The scattering is just very weak? This may be the case, but glassy carbon scatters very well, and so it would spell doom for the initiative if we cannot see anything even for this sample.
- Bad detector electronics settings? While I do not remember having touched the detector electronics since version one, it could be that the settings are no longer appropriate for the current detector output. A readjustment may be in order. However, this is unlikely to change much.
- Perhaps the sample was poorly mounted? A quick check of the sample position, however, shows that the sample holder is mounted in the correct place..
- Twitter users weighed in with their possible causes, whcih consisted of: 5) Gremlins (though no droppings were found), 6) Profit! So much for the power of the internet.
And so the good result will have to wait. Perhaps the new detector will bring clarity, or perhaps I can troubleshoot my way out of this somehow. Time will tell.

Dear Brian,
speaking of USAXS, what minimum q do you think you can reach? What q_min have you already reached?
Thank you.
Dear Paul,
Eyeballing the patterns in the blog post, we see an FW10%M of about 1.5E6 1/m (or 0.0015 1/nm in more common units). This would be the resolution with which we can probe the scattering pattern, and would allow us to measure structures up to an R_max of about 2 micrometer.
This is a typical R_max for X-ray USAXS instruments. Neutron USANS machines typically go an order of magnitude better to 20 microns. In exceptional cases (like Jan Ilavsky’s instrument), USAXS instruments can also reach 20 microns by employing higher-order reflections coupled with higher-energy photons.
I hope that answers your question.
Cheers,
Brian.