

Background subtraction and in-situ experiments are both made easier with the provision of a good flow-through cell. While we have a stainless steel cell with really low scattering silicon nitride windows, we also wanted something a bit more “disposable” for dirty experiments. Also, the seals in the silicon nitride cell aren’t as chemically inert as could be, so bonus points if we could have a cell that was resistent to the majority of solvents we throw at it. It’s nothing radical, but here is our take on such a cell, complete with CC-BY-licensed designs, pictures and details for you to copy if needed…
Our starting point was a cell from PEEK which was used by Tomasz Stawski from the GfZ in Potsdam. This cell was used at the Diamond Light Source for in-situ experiments, and featured a glass capillary in a PEEK holder with two HPLC fittings on the sides. We adapted this design in the following ways:
- The cell was to be as compact as possible, so that we could fit multiple cells on a rack. That meant shaving off extra material wherever possible.
- A kinematic mounting solution needed to be added that allows for reproducible and quick (re-)placement of these cells onto a rack.
- To make the cell more useful for other experiments (such as XRF and XRD), the exit aperture needed to be as large as possible. This was accomplished by removing the top half of the cell, allowing for detectors to be placed at 90˚ to the incident beam.
- Holes should be added to allow mounting of optional sleeve heaters to the capillary.
So far, so good. After some iterations, we arrived at the design as shown in Figure 1. The V-grooves are intended for reproducible positioning in a holder with three of these ball-ended thrust screws in place, and the holder is fixed onto the rack with a single M3 thumbscrew through the center. Tests show that this holder with attached Teflon hoses is vacuum-tight at our sample chamber’s 1 Pa of pressure. The four threaded holes are for mounting a (to be designed) future small sleeve heater.
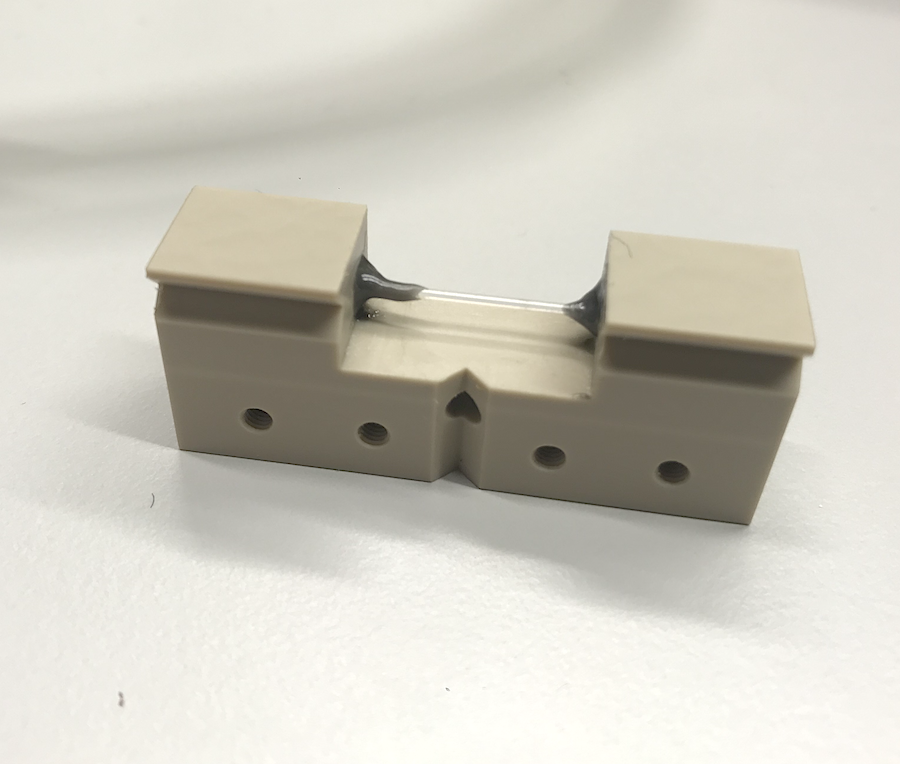
The capillary is an extruded borosilicate glass capillary from Hilgenberg (number 1471187), with an internal diameter of 0.96 mm (as verified by transmission measurements), a wall thickness of about 20 microns, and coming in lengths of 75 mm. These capillaries have a transmission factor of about 70% when empty, and 30% when filled with water, and so are ideal for aqueous suspensions.
This capillary is cut in half, glued into place with Araldite 2014-2 epoxy, and the ends clipped off. A video of this capillary mounting / gluing procedure will be made available in the near future. As these capillaries are extruded (as opposed to the traditional, hand-drawn Mark tubes with awful reproducibility), these capillaries are consistent in wall thickness and sample diameter, and thus work better for background subtraction procedures. Since these are flow-through capillaries, the background is — as it should be — measured in the same capillary prior to the actual experiment.
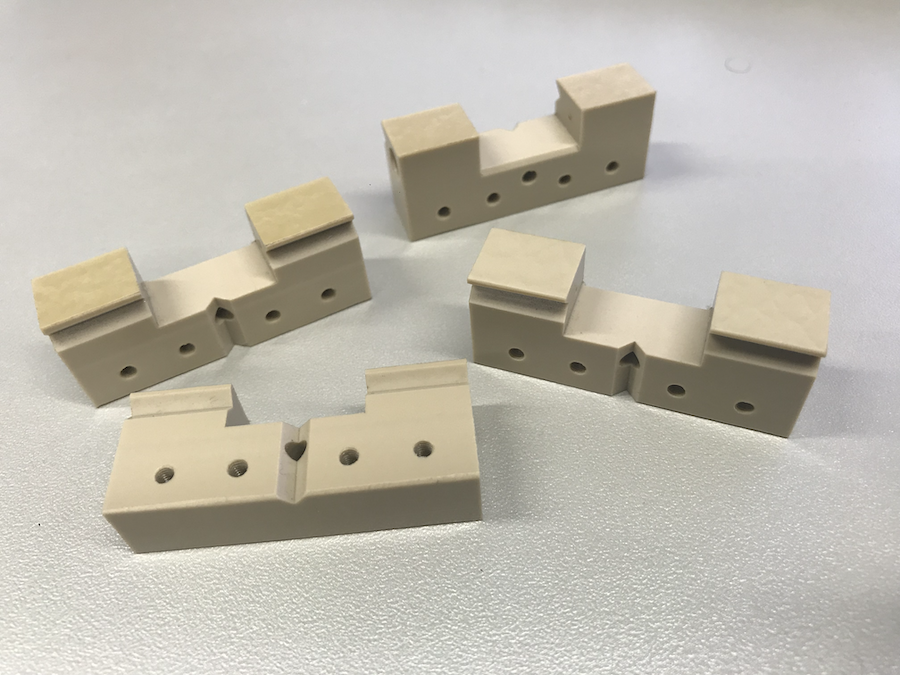
Our convenient, in-house workshop has a steady stream of interns. The manufacturing of four more of these holders was, therefore, handed over to these interns who made short work of the production. Four more holders have since been made with a turnaround time of a week, so I am appropriately impressed. They seem to be easy enough to make to a high standard.
As explained in this old post, the holder has been designed in OpenSCAD, and then drawn using the TechDraw workbench in FreeCAD. The source files for these are available at the bottom of this blog post. Note that with the technical drawing of the PDF, that the UNF threads for the HPLC fitting should ideally end at the bottom in a flat section for a better seal with the ferrule. A conical (drill) end works as well, but is less ideal. If you make some improvements on the design, we would be happy if you share with us your modifications and reasoning (and the wider community if you want). If you use these capillary holders yourself as is, we are always happy with being acknowledged, as per the terms of the CC-BY license under which the designs are made available.
Next, we will work on the rack intended to hold these things, as well as a range of other sample holders. This rack will then sit on our new standard s-sized mount (Thorlabs KB75/M as discussed here), replacing the custom small mount that came with the MAUS.
Small thing: The click to enlarge doesn’t work.
What HPLC fittings are you using? I’m thinking about making a stack of these just for static experiments; 5 or 6 capillaries so I can set up a measurement and come back tomorrow.
We’re using the 1/4″ 28G UNF threaded fittings (https://www.bola.de/en/technical-information/screw-joints/determination-thread-types/unf-14-28g-thread/), these can be used with either flanged tubes or ferruled fittings, and are so far very reliable connecting in our vacuum chamber.
We’re having a rack built that puts three of these on top of each other, I’ll share the design once we’ve verified that it works as intended. Tomorrow, I should also have a video ready showing how to glue the capillaries in.
I’ll try to fix the click to enlarge…
Any particular reason why you chose PEEK over Teflon? Is it the mechanical properties?
Absolutely! Working with Teflon is a workshop nightmare. Similar to trying to shape toothpaste, it accepts virtually no force whatsoever during clamping, milling and drilling and will deform irreparably with the slightest bump. Teflon threads are similarly very soft and break very easily, and if you accidentally heat teflon too much, it will emit horrible gases.
PEEK on the other hand behaves like a dream in the workshop, accepts fine threads, and can even be 3D printed if you need complex shapes. It’s only marginally less chemically inert than Teflon, but much more rigid and durable.